RC10C Ritchey-Chrétien OTA and Optics
|
|
|
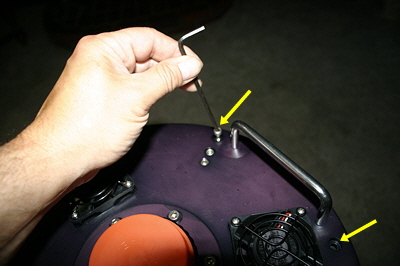
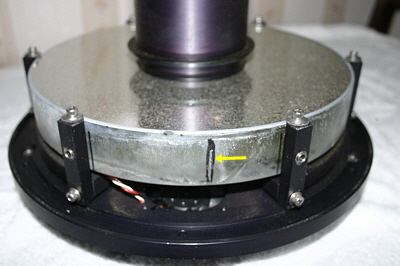
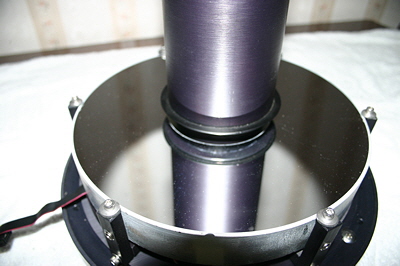
With the OTA resting on its face remove outer screws around the backing plate as indicated by the arrows. The inner set of screws are for mirror alignments so don't touch these yet. |
This is where a second person is needed. Holding up the mirror assembly, reach into the narrow opening to slide the ribbon connector out of the plug. This disconnects the fans, focuser stepper and dew heaters. I recommend wearing a short sleeve shirt because your hand and lower arm will come close to the mirror surface. |
|
|
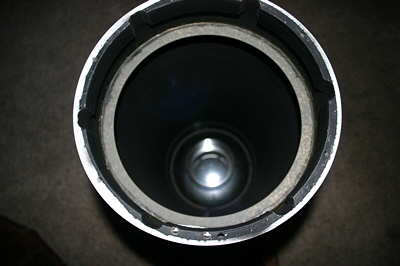
| Inside view of OTA showing secondary mirror towards the front and aperture mask near the rear edge. The notches around the edge are where the mirror support arms reside in. The secondary mirror was very clean so I left that alone and cleaned only the primary mirror. | View of mirror and baffle tube assembly. The black connector on the right is the ribbon cable. |
|
|
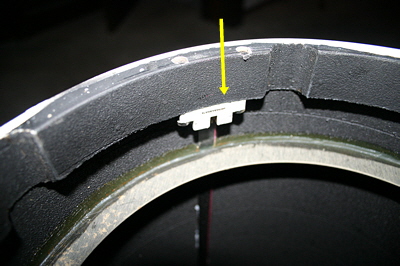
| This is a factory index mark scribed into the glass that points to the top position within the OTA. The black marks along the side of the mirror support arms I made using a felt tip marker this way it made it easy to position the mirror during re-assembly. |
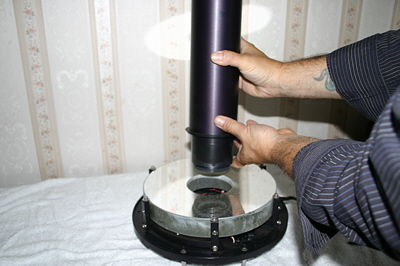
The baffle tube (also houses the corrector cell) unscrews from backing plate. Here you may need a second person to hold the backing plate handles until the tube turns freely. |
|
|
|
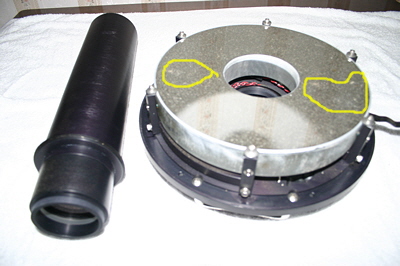
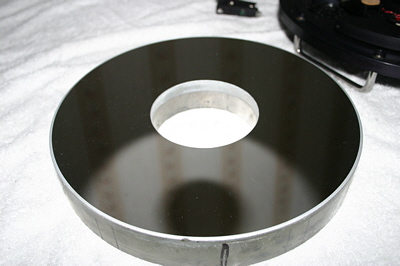
Mirror and tube separated. Notice the corrector cell at the base of the tube.
I highlighted the areas in yellow where wet leaves left marks and thick crud on the surface. Also easily seen is the layer of dust and pollen that settled on the mirror surface. |
Using a waterproof felt tip marker I labeled each mirror support arm with a number and also traced out on the mirror edge where each arm was positioned originally. This makes re-assembly much easier. Holding the mirror support arm, remove only the bottom allen screw and carefully move it away from the mirror. The middle screw is for adjusting what looks like a nylon button. I left these untouched as there was no need to adjust them and I wanted to preserve the factory positioning. |

|
|
| The mirror has weight so hold it firmly and by the edges only. |
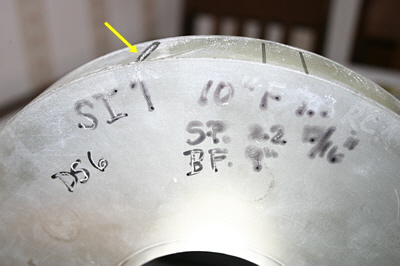
Rear view of mirror showing production markings that were etched in and also highlighted with a marker during manufacture. The SI scribe appears to be an index mark. Also seen is the back focus 'BF 9"', size '10"', Focal ratio 'F7.3', serial number 'DS6'(my OTA is S/N 6), mirror spacing 'SP' |
|
|
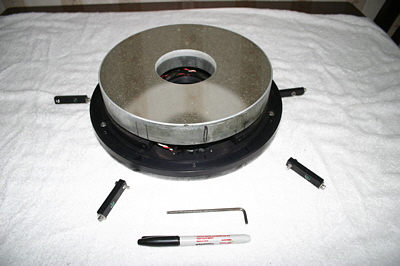
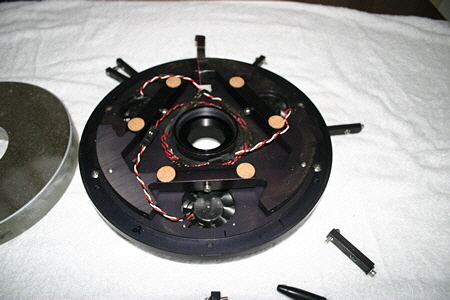
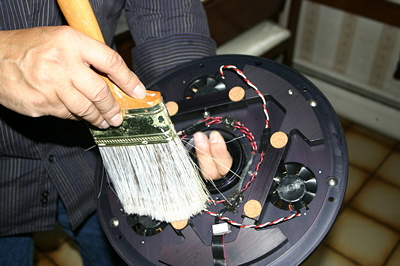
| View of the 6 point floating mirror support assembly. | Using a soft brush to remove the dust and some small spider webs. |
|
|
|
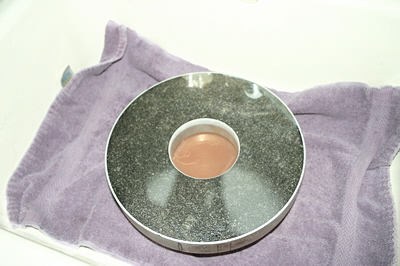
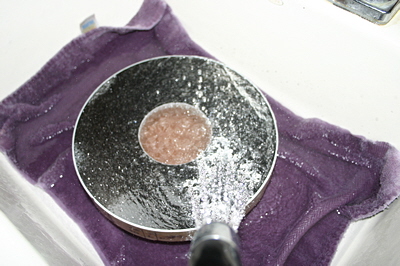
Placing a towel and plastic bowl in the sink, the mirror is put into place. The bowl is large enough to support the mirror base firmly. |
After placing a mixture of Palmolive soap and filtered water (1 teaspoon to 1 gallon of water) on the surface and letting it stand for a minute, a stream of warm water is next used to wash the mirror surface clean. Areas where leaves left crud I used wet cotton balls and applied small lightly dabbing strokes while keeping a stream of water directed until the spots were gone. The mirror is then placed vertical for 1 minute to allow water runoff then placed horizontal. A mixture of 1 gallon filtered water and 1 ounce of 97% alcohol is poured across the mirror surface as a secondary flush. The mirror is stood vertical again for 1 minute then afterwards laid flat. Using white Kleenex tissue that is 'puffed' and dampened with the water/alcohol mixture, small dabs were applied to remove minor spots. Let the mirror dry for 30 minutes before re-assembling. |
|
|
|
Cleaned mirror is let to dry at least 30 minutes before assembly. During this time dust may settle. Just use a bulb to blow it off. Never touch the surface! |
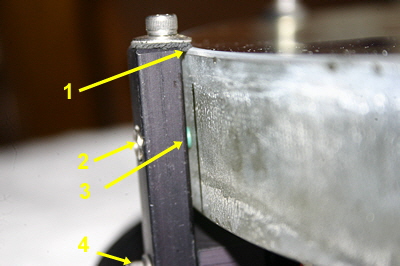
The mirror support arms were re-installed to their original locations using numbers assigned earlier. Carefully holding the arm, loosely install the bottom retaining screw (#4) and then let the arm slide down until the rubber edge under the top cap (#1) touches the mirror edge. While gently holding the top cap against the mirror edge and making sure the arm is vertical, secure the bottom screw (#4). When installing the opposite support arms it may be necessary to slide the mirror towards the arms already installed. The object is to get the mirror sides to contact the green buttons (#3) on the arms. This is for support and for proper centering. Once all arms are secured visually inspect to make sure the mirror is contacting the green buttons. If you left the adjustment screw (#2) alone then this should not need adjusting. If you need to adjust these then adjust screw #2 until the button just contacts the mirror side. Also verify that there is indeed rubber contacting the mirror edge as referenced by #1. |
|
|
|
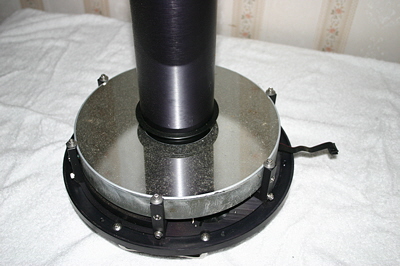
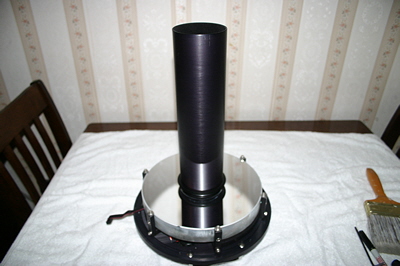
Baffle tube re-installed and whole assembly ready for installation. After removing a huge spider nest and its victims from deep inside the baffle tube, I made a custom extension to reach down and clean the corrector face inside the tube using Kleenex and a water/alcohol mix. I wasn't able to remove the corrector from the tube so I decided to clean it attached. I was surprised of the amount of dirt film that was removed from the corrector lens. The other end of the corrector was clean so I left that side alone. |
A closer view of a much cleaner mirror. |
Reassembly- Reassembling the OTA is easy especially since I left the mirror support arms at the factory settings. The only part that took some care and patience was reinstalling the ribbon connector to the OTA mounted plug due to the limited space to get your hand in. This is where a second person can help support the weight of the mirror. Afterwards, installing the backing plate mounting screws was straight forward. The OTA body uses stainless T-nuts so you only need to tighten the screws enough to securely hold the mirror assembly firmly.
Collimation-
Up until the cleaning, this OTA still held collimation from when it left the factory. One reason to preserve the original mirror support arm locations and adjustments was to minimize physical re-alignments and also to make collimation easier.
For the initial physical mirror alignment I used a Cheshire tool that is used for reflectors. Inserting it into an 1.25" extension that was long enough to clear the inner surface of the corrector from contacting the tool and pointing to an area of the sky, minor adjustments were made using the 3 screws located on the secondary mirror assembly until the small alignment circle on the secondary mirror surface was centered in the cross hairs of the tool. Once the secondary circle was centered, the 3 sets of push/pull screws on the backing plate were finely adjusted until I could see a concentric image circle through the Cheshire tool (the circle is dark but still visible). There are better tools for R/C mirror alignments but the Cheshire is all I had at the moment and worked excellent by achieving the goal.
That evening during star testing I only had to perform a very minor tweak to one of the push/pull screw sets to get a perfectly concentric pattern within the airy disk. Snugging the 'push' screws locks the alignment in place and surprisingly didn't shift the airy pattern. Collimating this OTA was easier than I thought.
Summary
I learned that leaving off the OTA cover for convenience wasn't a good idea especially during the pollen season in the early spring. And when viewing the OTA during an imaging session using a remote IP camera, I can clearly see spiders at times crawling on the OTA. Until I devise another method of covering the OTA opening in such a way as to keep 100% remote, I'll manually install the cover at the next opportunity after each imaging session. After all, I am only 60 feet from the observatory. I'm also going to installed a fiber material over the fans to keep out the insects.